Pages

Friday, 21 June 2013

Sexy General - PTU

This Tut was written by me on the  21st June 2013

Supplies Needed

Font of choice

Filters Unlimited

Scrapkit - Here

Tube by The Hunter - Here

Drop shadow 1,1,60,6.

After resizing > adjust sharpness > sharpen.

Open blank image 800 x 800.

New raster layer, select all, copy and paste paper 3 into selection, select none, apply Filters Unlimited square edge 5.

Add element 16, move to top left of canvas.

Add element 83, move to top left of canvas.

Add element 14, using magic wand , click inside of frame, select, modify expand by 5,paste paper 3 as a new layer, select, invert, delete.

Arrange, move down.

Keep selected, add close up of tube, delete, blend - luminance legacy.

Add element 76, add drop shadow..

Add element 40,  add drop shadow.

Add element 24, image mirror, add drop shadow..

Add tube, resize, add drop shadow.

Add element 11, resize 60%, add drop shadow.

Add element 64, resize 60%, add drop shadow. 

Add element 67, resize 60%, add drop shadow.

Add element 6, resize 50%,  free rotate right, add drop shadow.

Add element 4, resize 60%,add drop shadow.

Add element 72, resize 60%, add drop shadow.

Add element 2, resize 60%,  duplicate, resize 80%, free rotate right, add drop shadow.

Add name and ©, resize to your liking .


Wednesday, 19 June 2013

Mermaid Ella


This Tut was written by me on the  19th June 2013

Supplies Needed

Font of choice

Mask of choice

Scrapkit - Sylia by Design by Joan 

You can buy it  Here

Tube by Misticheskaya 

You can buy it Here


Drop shadow 1,1,60,6.

After resizing > adjust sharpness > sharpen.

Open blank image 800 x 800.

New raster layer, select all, copy and paste paper 3 into selection, select none,apply mask, merge group.

Add element 47, add drop shadow.

Add element 56.

Add element 16, add drop shadow..

Add element 14, add drop shadow..

Add element 46,  add drop shadow.

Add element 53.

Add tube, resize, add drop shadow.

Add element 27, resize 80%, add drop shadow.

Add element 57, free rotate right , add drop shadow. 

Add element 62, resize 60%, add drop shadow.

Add element 32, resize 60%,  add drop shadow.

Add element 66, resize 40%,add drop shadow.

Add element 63, resize 40%, add drop shadow.

Add element 34, resize 40%, add drop shadow.

Add element 26, resize 40%, add drop shadow.

Add element 69, resize 15%, add drop shadow.

Add element 29, resize 40%, add drop shadow.

Add element 44, resize 60%, add drop shadow.

Add element 67, resize 55%, add drop shadow.

Add name and ©, resize to your liking .

Skater Girl - PTU

This Tut was written by me on the  19th June 2013

Supplies Needed

Font of choice

Mask of choice

Scrapkit - Afro Skates by Design by Joan

You can find it Here

Tube by Danny Lee - 

You can find it  Here

Drop shadow 1,1,65,6.

After resizing > adjust sharpness > sharpen.

Open blank image 800 x 800.

New raster layer, select all, copy and paste paper 6 into selection, select none,apply mask, merge group.

Add element 1,  add drop shadow.

Add element 22, add drop shadow.

Add element 74, resize 80%.

Add element 27, resize 60%, add drop shadow..

Add element 6,  resize 80%, add drop shadow.

Using magic wand, click inside frame, select, modify, expand by 5, paste 5 as a new layer, select, invert, delete.

Arrange, move down.

Keep selected, add close up of tube, delete, blend - luminance legacy.

Add element 70,  resize 50%, free rotate right, add drop shadow.

Add element 55, resize 80%, free rotate left, add drop shadow.

Add element 42, add drop shadow. 

Add element 36, add drop shadow.

Add element 29,  add drop shadow.

Add element 72, resize 60%, image mirror, add drop shadow.

Add element 43, resize, 40%, add drop shadow.

Add element 19, resize 50%, add drop shadow.

Add element 41, resize 80%, image mirror. 

Add tube, resize, add drop shadow.

Add name and ©, resize to your liking .

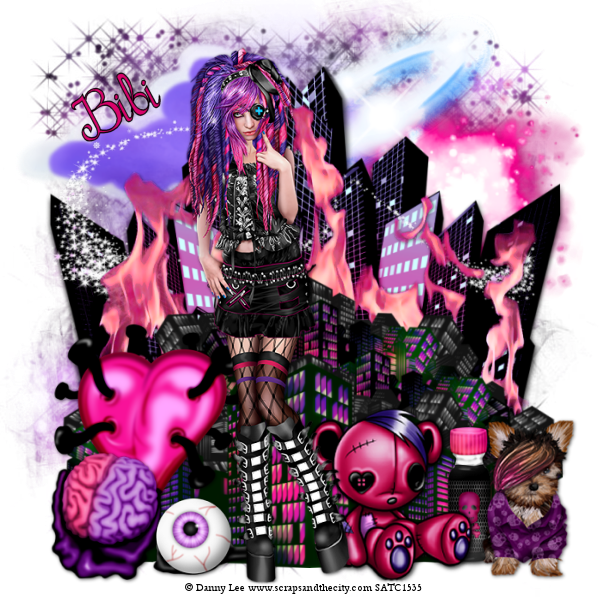
Cybergoth - PTU


This Tut was written by me on the  19th June 2013

Supplies Needed

Font of choice

Mask of choice

Scrapkit - Cybergoth by Bibi's Collection 

You can find it  Here

Tube by Danny Lee

You can buy this tube  Here

Drop shadow 1,1,65,6.

After resizing > adjust sharpness > sharpen.

Open blank image 800 x 800.

New raster layer, select all, copy and paste paper 13 into selection, select none,apply mask, merge group.

Add element 61, resize 80%.

Add element 66, resize 60%, add drop shadow.

Add element 119, resize 90% , add drop shadow.

Add element 16,  resize 90%, add drop shadow.

Add element 69, resize 70%.

Add element 86,  add drop shadow.

Add element 17, resize 70%, add drop shadow.

Add element 70, resize 40%, add drop shadow. 

Add element 32, resize 60%, add drop shadow.

Add element 108, resize 60%,  add drop shadow.

Add element 87, resize 50%,add drop shadow.

Add element 33, resize, 80%, add drop shadow.

Add element 132, resize 40%, add drop shadow.

Add tube , resize to liking, add drop shadow.

Add name and ©, resize to your liking .
Tuesday, 18 June 2013

Dark Warrior - PTU


This Tut was written by me on the  18th June 2013

Supplies Needed

Font of choice

Mask of choice

Scrapkit - Angel Warrior by Design by Joan 

You can buy it Here

Tube by  The Hunter 

You can buy it Here

Drop shadow 1,1,65,6.

After resizing > adjust sharpness > sharpen.

Open blank image 800 x 800.

New raster layer, select all, copy and paste paper 9 into selection, select none,apply mask, merge group.

New raster layer, select all, copy and paste paper 10 into selection, select none,apply mask, merge group, resize 80%.

Add element 80, image mirror, add drop shadow.

Add element 23, resize 40%, add drop shadow.

Add element 6, duplicate, image mirror, add drop shadow..

Add element 61.

Add element 37,  resize 80%.

Add element 11, resize 80%, add drop shadow.

Add element 40,  add drop shadow.

Add element 91, resize 80%, add drop shadow.

Add element 1, resize 60% , add drop shadow. 

Add element 51, resize 60%, free rotate left, add drop shadow.

Add element 25, resize 60%, free rotate right, add drop shadow.

Add element 17, resize 60%,add drop shadow.

Add element 38, resize, 80%, add drop shadow.

Add element 3, resize 60%, add drop shadow.

Add element 28, resize 50%, add drop shadow.

Add tube, resize, add drop shadow.

Add element 43, resize 50%, add drop shadow.

Add name and ©, resize to your liking .

Dark Mermaid - PTU

This Tut was written by me on the  18th June 2013

Supplies Needed

Font of choice

Mask of choice

Scrapkit- Dark Mermaid by Bibi's Collection

You can find it  Here

Tube  of choice - I am using the artwork of The Hunter
You must have a proper licence to use this work.

You can buy this tube  Here

Drop shadow 1,1,65,6.

After resizing > adjust sharpness > sharpen.

Open blank image 700 x 700.

New raster layer, select all, copy and paste paper 7 into selection, select none,apply mask, merge group.

Add close up of tube, apply 20-20 mask, merge group, blend - luminance legacy.

Add element 48, move down to bottom of canvas..

Add element 101, resize 60%, add drop shadow.

Add element 27, resize 70% x 2, duplicate, image mirror.

Add element 2,  add drop shadow.

Add element 18, resize 50%, add drop shadow.

Add element 10,  add drop shadow.

Add element 55, resize 60%, add drop shadow.

Add element 52, resize 70% x 2, add drop shadow. 

Add element 57, image mirror, add drop shadow.

Add element 56, resize 60%,  add drop shadow.

Add element 15, resize 70%,add drop shadow.

Add tube, resize, add drop shadow.

Add element 58, resize, 70%, add drop shadow.

Add name and ©, resize to your liking .

Monday, 17 June 2013

Dazzle Me - FTU

This Tut was written by me on the  17th June 2013

Supplies Needed

Font of choice

Mask of choice

Scrapkit- Dazzling by Bibi's Collection

You can find it Here

Tube  of choice - I am using the artwork of The Hunter
You must have a proper licence to use this work.

This was bought when he was at PTE, but he is available at Here

Drop shadow 1,1,65,6.

After resizing > adjust sharpness > sharpen.

Open blank image 700 x 700.

New raster layer, select all, copy and paste paper 12 into selection, select none,apply mask, merge group.

Add element 19, paste as a new layer, add drop shadow

Using magic wand, click inside frame, select, modify, expand by 5,paste paper 4 as a new layer, select invert, delete.

Arrange move down.

Keep selected add tube, duplicate, click on original, delete, select none

Move copy of tube above the frame, and erase any tube from the bottom of the frame.

Add element 2, resize 60%, add drop shadow.

Add element 54, resize 80%, add drop shadow.

Add element 29, resize 80%, add drop shadow.

Add element 13, resize 50%, add drop shadow.

Add element 47,  add drop shadow.

Add element 94, resize 70%, erase part of the catch, so it looks like it's hooked on to the frame, add drop shadow.

Add element 52, resize 80%, image mirror, add drop shadow. 

Add element 12, resize 60%, add drop shadow.

Add element 36, resize 70%, image mirror,  add drop shadow.

Add element 42, resize 70%,add drop shadow.

Add name and ©, resize to your liking .