Pages

Showing posts with label St Paddy's. Show all posts

Monday, 2 March 2015

Irish Cheer


This Tut was written by me on the 2nd March 2015

Supplies Needed


Font - LD Celtic

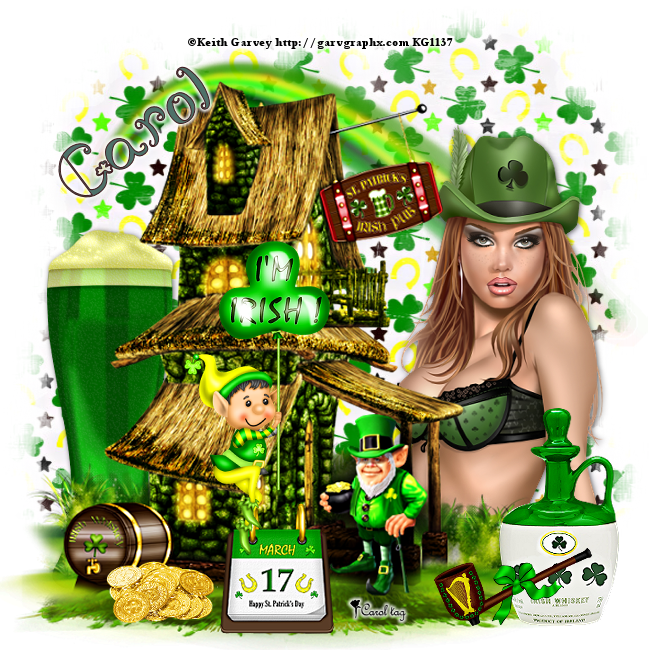
Mask 222 by Wee Scots Lass

Scrapkit- Irish Pub by Inzpired Creationz

Tube by Keith Garvey

Drop shadow 1,1,60,8

After resizing > adjust sharpness > sharpen.

Open blank image 650 x 650

New raster layer, select all, paste paper 1 into selection, select none.

Apply mask, merge group.

Add element rainbow 1, duplicate, merge down.

Add element beer 1, resize 85%,  add drop shadow.

Addtube, resize, add drop shadow.

Add element irish pub 1, resize 90%,  add drop shadow.

Add element irish whisky 1, resize75%, add drop shadow.

Add element coins 1 , resize 30%,  add drop shadow.

Add element pipe 1, resize 40%, add drop shadow.

Add calendar 1, resize 35%, add drop shadow.

Add elf 2, resize 70%, add drop shadow.

Resize, add name and copyright.

Monday, 16 February 2015

Feeling Lucky


This Tut was written by me on the 16th Feb 2015

Supplies Needed

Word art of choice

Font - Irish Participants

Mask 364 by Wee Scots Lass

Scrapkit- Feeling Lucky by Manipulated by Magik

Tube by Alex Prihodko

 Available at Pics for Design

Drop shadow 1,1,60,6

After resizing > adjust sharpness > sharpen.

Open blank image 650 x 650

New raster layer, select all, paste paper 5 into selection, select none.

Apply mask, merge group.

Add element paint smear, duplicate, image mirror, add drop shadow.

Add element flower 1, resize 70%,  add drop shadow.

Add element whiskey barrel, resize 60%,  add drop shadow.

Add element balloons,  add drop shadow.

Add tube, resize, add drop shadow.

Add element pot of gold,  add drop shadow.

Add element mouse, resize 60%, add drop shadow.

Add word art, add drop shadow.

Resize, add name and copyright.

Sunday, 2 March 2014

Leaping Leprechauns


This Tut was written by me on the 2nd March 2014

Supplies Needed

Font of choice

Mask 302 by Wee Scots Lass

Scrapkit- Leaping Leprechauns by Kittz Kreationz

Tube by Nadezhda

 Available at Pics for Design

Drop shadow 1,1,60,6

After resizing > adjust sharpness > sharpen.

Open blank image 650 x 650

New raster layer, select all, paste paper 1 into selection, select none.

Apply mask, merge group.

Add element 28, add drop shadow.

Add tube, resize, add drop shadow.

Add element 1, resize 80%,  add drop shadow.

Add element 10, resize 60%,  add drop shadow.

Add element 32, resize 60%,  add drop shadow.

Add element 29, resize 60%,  add drop shadow.

Add element 6, resize 60%, add drop shadow.

Add element 24, resize 60%, add drop shadow.

Resize, add name and copyright.


Sunday, 10 March 2013

Lucky Me - PTU


This Tut was written by me on the 10th March 2013.


Supplies Needed

Font of choice
Mask of choice

Scrapkit- Lucky Me by Sweet Dreams Scraps
You can find it Here

Tube of choice - I am using the artwork of Elias Chatzoudis

You must have a proper licence to use this work.
You can get it Here

Drop shadow1,1,65,5

Open blank image 700 x700

New raster layer, copy and paste paper 7 as a new layer, apply mask, merge group.

Open element 3, paste as a new layer, resize by 80%


Using magic wand, click inside the frame> select modify expand by 4,paste paper 4 as a new layer>select>invert>delete>move below the frame.


Add tube of choice> duplicate>select original layer>delete>select none>go to copy of tube and erase any hanging over bottom of the frame., add drop shadow to the frame


Add element 77 , resize 40%, add drop shadow.

Add element 96, resize 20%, add drop shadow.

Add element 88, resize 25%,free rotate right 60%, add drop shadow.

Add element 51, resize 25%, add drop shadow.

Add element 53, resize 40%, add drop shadow.

Add element 40, resize 20%, add drop shadow.

Add element 38, resize 30%, add drop shadow.

Add element 89, resize 30%, add drop shadow.

Add element 33, resize 30%, add drop shadow.

Add element 23, resize 35%, select all, airbush, using a gradient/colour of choice, add small gradient glow


Resize to your liking, add copyright and name, save as a jpeg.

St Paddy's Day - FTU


This Tut was written by me on the 10th March 2013


Supplies Needed

Font of choice
Mask of choice

Scrapkit- St Paddy's Day by Kittz Kreationz

Here

Tube of choice - I am using the artwork of Zlata.

You must have a proper licence to use this work.
You can get it Here

Drop shadow 2,2,65,5

Open blank image 700 x700
New raster layer, copy and paste paper 2 as a new layer, apply mask, merge group.

Open element 25, paste as a new layer, resize by 60%


Using magic wand, click inside the frame> select modify expand by 4,paste paper 5 as a new layer>select>invert>delete>move below the frame.


Add tube of choice> duplicate>select original layer>delete>select none>go to copy of tube and erase any hanging over bottom of the frame., add drop shadow to the frame


Add element 28 , resize 80%, add drop shadow.

Add element 23, resize 40%, rotate 15 degrees to the right, add drop shadow.

Add element 20, resize 40%, add drop shadow.

Add element 32, resize 40%, add drop shadow.


Resize to your liking, add copyright and name, save as a jpeg.

Saturday, 9 March 2013

Kiss Me - PTU


This Tut was written by me on the 19th Jan 2013

Supplies Needed

Font of choice
Mask of choice

Scrapkit- Gaga Irish by Sky Scraps
You can find it Here

Tube of choice - I am using the artwork of Keith Garvey.

You must have a proper licence to use his work.
You can get it Here

Drop shadow 2,2,65,5

Open blank image 700 x700, floodfill with #ffffff
New raster layer, copy and paste paper 5 as a new layer, apply mask, merge group.

Open element 20 paste as a new layer, resize by 80%


Using magic wand, click inside the frame> select modify expand by 6,paste paper 3 as a new layer>select>invert>delete>move below the frame.


Add tube of choice> duplicate>select original layer>delete>select none>go to copy of tube and erase any hanging over bottom of the frame.


Effects>Zero Porcelain using these settings 50,128,128,0,0,0


Select rainbow>paste above paper layer and resize.

Copy and paste the following elements, resize and add a drop shadow.
E1
E2
E5
E27
E21
E32
E35
E68

Resize to your liking, add copyright and name, save as a jpeg.


If animating:

Duplicate E32.Select duplicate layer, use the warp brush - size 60, pull the frog's lips down a little.

Go to the top layer , add new layer, floodfill with #416523
Select all, select, modify, contract by 5 - delete, select none.

Add a small inner bevel to the frame layer.

Open Animation Shop

Close the copy of the frog.

Copy merged, paste as a new animation, close original frog layer, open copy of frog layer, copy merged, paste after current frame.

Edit, select all , animation, frame properties - set frame to 18

Save as gif.